Friday, 27 January 2017

Science Fun with The Curiosity Box!

We recently had fun exploring science with a box from The Curiosity Box
This company offers monthly subscription boxes packed with science fun, aimed at 7-11 year olds.
These boxes bring hands-on exploration and exciting discovery each month, engaging children in learning without them even knowing!

The girls were hugely excited to receive their box and were eager to dive in. Both of them are keen on science so I knew this would be a hit.


The people over at The Curiosity Box are keen on using bio packaging where possible and encourage recycling. 
As expected the girls had the box opened up within seconds and a purple tissue layer kept their excitement in suspense for a few extra seconds and enhanced the presentation too!

Inside the box the girls found information cards about this month's theme and three activities, This month featured electricity. 


Each activity was individually wrapped and contained a clear and concise instruction card. 
These were laid out in a very child-friendly and appealing manner and the girls decided to give the Static Electricity activity a go first. 

They had a fun half hour with the balloons, ping pong balls and sequins as they experimented with static electricity, taking their exploration further by seeing where else they could stick the balloons when statically charged!


Then it was on to the Sparkly Sculptures.

This required the girls to make two different types of dough; one salt based and the other sugar based. All ingredients and instructions were included to make the dough and (with a little supervision when cooking the salt based dough) they soon had these prepared.


(N.B. the dough has actually lasted well over a week when kept in an airtight container so they have returned to this several times, including taking it into school to show their classmates and Teachers!)

To explore the conduction of electricity through the salt dough or insulating of it using the sugar dough, the box comes complete with a battery pack, batteries and eight mini LED lights!

This was great fun, they also discovered how to create a short-circuit too.


We still have the Electric Artwork to look forward to, that's this weekends fun!

The girls verdict on the Curiosity Box - 

"WOW!!! This is great fun, I really loved the dough and electricity experiment. I have a circuit set already and I could make some of this work using the dough too!" - Emily

"I think the box is really good for kids, it let"s us explore science by ourselves without needing a grown up. It's good that the box has everything you need, it makes it easier to do the experiments. I'd like to try more. Emily and me asked at school if we could have a Science Fair and they have said yes! So I think some of these boxes would be good to help the kids think of ideas. I might do some Electric Artwork for my project." - Mollie


To find out more about The Curiosity Box and their monthly subscription packages then visit their website or check out their Facebook page.


Jaimexx


Sunday, 22 January 2017

Moon Dough by Emily

I really LOVE making dough and experimenting with slime. I recently got some Kinetic Sand and enjoyed it. When I was watching Youtube videos about this I saw Moon Dough. I really wanted to get some but Mum found a recipe to make my own and it was easy!

All you need is Cornflour and hair conditioner. (Cornflour is really cheap to buy and available from supermarkets.)


Mix 1 part conditioner to 2 parts cornflour. This means for every measure of conditioner you need twice as much cornflour. I used a plastic cup tp measure but it really doesn't matter.

Once you have measured the ingredients just mix them together in a bowl until they form a dough, like playdough.


You can add food colouring but we didn't have any so I just kept mine white.

Then you can just enjoy!


The Moon dough kept for quite a few days in an airtight container and when it had started to go crumbly, Mum added some more conditioner to see if that would help and it worked really well.

The dough smells really nice because of the conditioner and was really soft. 

I'm now off to find out how to make slime and Kinetic Sand so keep your eyes peeled because I will share these with you when I try them. 

One thing I would say is that it is quite messy on your clothes when making or playing with this although it does wash out really easily. 

Emily :)


Saturday, 14 January 2017

Cheesy Bacon Bread

During the Christmas period we had a couple of evenings with friends around for food, drink and general merriment! Chris had spotted a recipe online he wanted to try and these evenings gave us the perfect opportunity to try out the recipe.

What you need:

A fresh uncut loaf
A round of Camembert 
Smoked bacon lardons
Olive oil
Oregano
Garlic


A baking tray
Sharp bread knife
Small dish
Small knife
Pastry brush or spoon


Firstly you will need to cut the loaf diagonally in both directions, make sure you only go 2/3's of the way through so it doesn't fall to pieces.


Slice the cheese into small bits and push a piece of this into each of the slits in the bread.


Then you need to mix the oil, oregano and garlic in the dish and set this aside for later.


Next, heat a frying pan and cook the bacon lardons until they are crispy. Then sprinkle these over the loaf, pushing them down into the slits with the cheese.


Lastly, drizzle the oil and herb mixture over the loaf and then bake for 20 minutes in a preheated oven (170C/325F/Gas Mark 3) or until the cheese has melted, make sure you don't leave it too long or the bread will burn!


Then serve, we had it as part of a hot and cold buffet but I think it would be lovely with a marinara sauce as a share and tear starter.


You could experiment with the type of cheese you use, or by adding chorizo or perhaps some pesto in the drizzle. Looking forward to trying a few different flavours with this!

Enjoy
Jaimexx


Saturday, 7 January 2017

Fritton Owl Sanctuary

I recently popped over to Fritton Owl Sanctuary to pick up some owl pellets for Emily for Christmas (don't ask!) and I had to try and be sneaky with this as I had the girls with me.


The Owl Sanctuary is situated at the back of Fritton Plant Centre, so I had hatched a plan that we were going there to search for a plant for Grandma. Whilst there I quickly scouted about to see where it was located and with Mollie in on the secret, I made out that I had just discovered it. I got them to wait outside whilst I went in to "ask" whether it was open to look around. In fact I was picking up the pellets.

Image taken from TripAdviser

Once I had the pellets safely hidden away in my handbag, I popped back to the girls and told them that we were allowed to have a look and did they want to?
Resounding chorus of yeses! 
So in we went.


The sanctuary is run by Mark and Louise, it provides a home and care for wounded owls, plus those that have been pets but the owners couldn't cope with them (FYI owls DO NOT make good pets, so no matter how cute you think they are, or how much of a Harry Potter fan your child might be - DO NOT buy an owl!)

Image from EDP

Whilst we were looking at the owls we were joined by Louise, she chatted to the girls about the different owls they have, their characteristics and breeds. And she answered endless questions from them about the owls.


Each of the owls appeared in good health, with full plumage of feathers and all were alert and perky. Their habitats were clean and spacious, most were in their own enclosures but a couple had two owls together.

Most of the owls were pretty vocal too and it was surprising to hear the different calls they made. I always presumed that owls just hoot but some of them were quite different, especially the one that sounded like coconut shells clopping!

There was also a cafe (this was closed during our visit) a small garden area and seating area. A display of owl boxes that the sanctuary place out in the wild and information boards. Plus a wooden wishing well for donations, this helps the sanctuary to keep running and to care for the birds. I made sure the girls put a few pounds in each.


What a lovely little discovery this place was, the girls have already asked when we can go back! I did notice Redwings Horse Sanctuary and Fritton Lake are all close by so these would make for a good day out, perhaps somewhere to take our friends Here Come The Hoopers when they next visit!


Jaimexx

Sunday, 1 January 2017

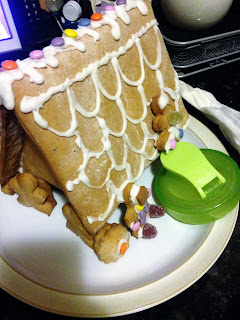
M&S Gingerbread House by Mollie and Emily

WOW! One of our advent gifts was this cute little Gingerbread House Kit from Marks and Spencer, we couldn't wait to get started on it. Mum lets us do cooking by ourselves (with a little help with the oven) so we had to read the ingredients and instructions first to make sure we had everything we needed.


The ingredients we needed were clearly listed on the front; butter, golden syrup and water. the rest of the stuff was in the box. So we got these together plus all the mixing bowls and spoons we needed. 


Mum put the oven on for us (190C/375F/Gas Mark 5.) We then rubbed butter all over the baking trays, Emily really enjoyed this bit!
Mum also told us another trick, to dust the baking trays with flour, this really helps things not to stick!

Then we unpacked the box. 


Everything we needed was clearly labelled and the instructions were printed on the side of the box so this was going to be nice and easy to bake.

Firstly we had to open the gingerbread mix, add the butter, golden syrup and water (we actually needed less water than it said so we ended up having to add plain flour to our mixture to make it into dough.)


Once we had the dough we had to knead it and then roll it out to about half a cm thick. At first we did it too thin so we had to do it again.


Then we had to cut out the shapes needed, the kit came with templates to cut round and we needed two roof pieces and two wall pieces, one of these needed a door cut out of it too. The we had to cut as many gingerbread men as possible or wanted from the leftover dough. This part was REALLY tricky and we gave up after 4! Instead we cut out some flower shapes using one of our cookie cutters, we thought we could make a garden around the house with these.


Then we baked them. It took two batches to get them all baked and each tray was in for about 7 minutes. Then we left them to cool.


When they had cooled we opened the icing mix and added a little water at a time to make a thick icing. The kit also came with an icing bag to fill and we just had to snip off the end.

We started to put the house together but it was really hard so we needed to call mum through to help us. We had to use all sorts of things to help us prop it together whilst it set!


And then it was finished! And we soon set about demolishing it again by eating it!


It was great fun and we will definitely get one again next year!

Happy New Year!!!

Mollie and Emily
xxx